This will be the finale of the trilogy of posts describing my GSoC project User Interface for Customizing Models.
In last two posts, I described the main features of OpenSCAD customizer. In this post we will start with how the customizer will be integrated in OpenSCAD initially and how will you be able to use it. And link to showing Customiser working is here:
Customizer feature will be added as an experimental feature to OpenSCAD. So, you will able taste it but How?
So, to get started with OpenSCAD you have to do not even little but tiny bit of efforts i.e.
- Go to Edit in the menu and click on Preference and you will be welcomed by a sub window.

- Now, click on Feature in that window.
- So, now you reached the list of experimental features that will one day make your life as modeler in OpenSCAD very easy.
- You need to click on check box corresponding to bleeding edge feature that you want to taste earlier.
- As we are more concerned customizer feature here. So, tick check box corresponding to enable customizer.
- Close the sub window.
- Lastly, Go to view/Hide Customizer and unhide it by clicking on it and your Most awaited feature of Year Customizer will be waiting to be explored by you.

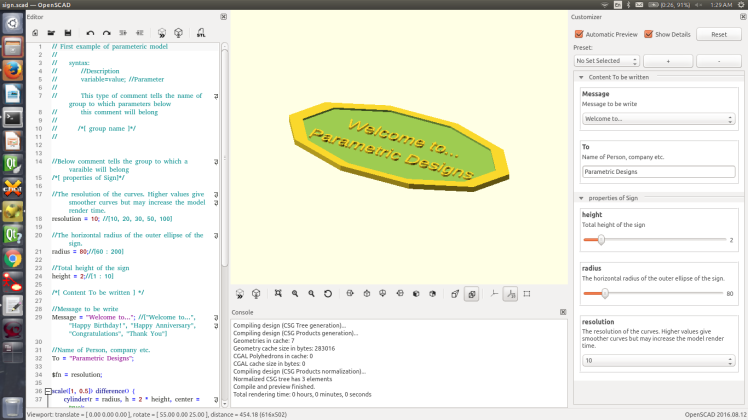
In customizer, You will be able to see two checkbox’s which are:
- Automatic Preview : If checked preview of model will be automatically updated when you change any parameter in Customizer else you need to click preview button after you update parameter in customizer.
- Show Details: If checked the description for parameter will be shown above the input widget for the parameter else It will not be displayed but you still can view the description by hovering the cursor over the input widget.
Then comes Reset button which when clicked resets the values of all input widgets for the parameter to default provided in SCAD file.
Next come Preset section: It consist of three buttons:
- combo Box
- It is used to select the set of parameters to be used
- + button
-
- It is used to update the set selected in combo Box. On clicking + button values of parameters in set are replaced by new values
- If we select “No set selected” in comboBox, then we can use + button to add new set of the parameters
- – button
- It is used to delete the set selected in combo Box.
and finally below Preset Section is the Place where you can play with the parameters.
For constructing the input widget of your desired choice, you can use the comment like syntax referred in the first post.
// variable description
variable name = default value; // possible values
The native syntax will not be supported in master OpenSCAD for some time (eventually, it will be part of OpenSCAD) but if you want to try it you can try it at:
https://github.com/openscad/openscad/pull/1669
And You can use the following syntax for Grouping:
/* [Tab Name] */
You can also refer to two examples that are Part of OpenSCAD to learn more:
- Parametric/sign.scad
- Parametric/candlStand.scad

And as, know This feature will be added experimental initially. So, there is difference how you will be using the feature of Customizer through cmd-line:
openscad -o --enable=Customizer <output-file> -p <parameteric-file (JSON File) > -P <NameOfSet> <input-file SCAD file >
- -p is used to give input JSON file in which parameters are saved.
- -P is used to give the name of the set of the parameters written in JSON file.
Make sure to check it out at and provide a feedback:
Latest snapshots( with Thingiverse syntax):
- Mac:
- Window:
- http://files.openscad.org/snapshots/OpenSCAD-2016.10.05-x86-32_gsoc2016-refactored-Installer.exe
- http://files.openscad.org/snapshots/OpenSCAD-2016.10.05-x86-32_gsoc2016-refactored.zip
- http://files.openscad.org/snapshots/OpenSCAD-2016.10.05-x86-64_gsoc2016-refactored-Installer.exe
- http://files.openscad.org/snapshots/OpenSCAD-2016.10.05-x86-64_gsoc2016-refactored.zip
- Source Code:

One thought on “User Interface for Customizing Models ( Part 3)”